After installing android studio on lubuntu, now i need to show you how to create a hello world program using android studio on lubuntu. This is a beginner tutorial, so if you are a senior android developer, you can ignore this article.
Okay first, i want you to open android studio IDE, open terminal and then go to bin directory inside android-studio directory and then execute the studio.sh, or just do it like this:
~/android-studio/bin/studio.sh
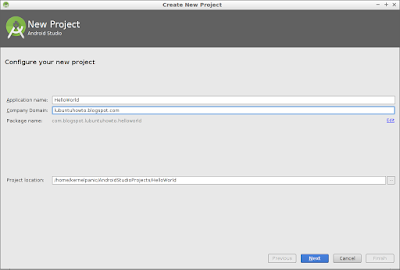
Once android studio is open, create new project, enter the application name as 'HelloWorld' and then company domain as 'lubuntuhowto.blogspot.com'.
Next on the 'Target Android Devices' screen, choose 'Phone and Tablet' and for the minimum SDK choose 'API 8: Android 2.2 (Froyo)' and then click next.

On the 'Add an activity to Mobile' screen/window, choose 'Blank Activity' and then click next, another screen/window will shows up.

On the 'Customize the Activity' screen, on the title section enter text 'Hello World!' and then click the finish button.

You should see the 'HelloWorld' project workspace, at this point because it's just a hello world program, means we just want to show something to the standard output, we don't need to modify the code.

So we are just going to run the application on an AVD (Android Virtual Device), to do that click on run app button (the big green triangle/arrow button), or just press CTRL + F10.

If you don't have any AVD yet, you need to setup first, on the 'Device Chooser' screen, click the '...' button (next to the drop down menu). You will see the 'Android Virtual Device Manager' screen, click on '+ Create Virtual Device...' button.

On the 'Select Hardware' screen, choose category 'Phone' and the device is '3.2" QVGA (ADPA2)', and then click next.

On the 'System Image' screen, choose 'Froyo' (API Level 8), if you want other API, you need to download them first, but it will take a lot of space on your hard drive, so for now just use 'Froyo'.

On the 'Android Virtual Device (AVD)' screen, enter 'froyo 3.2 inch' as the AVD name and then click the finish button.

Next on the 'Your Virtual Devices' screen, run the emulator by pressing the green triangle/arrow button on the 'Actions' section of 'froyo 3.2 inch'.

It takes a while to run the emulator (AVD), so be patient, once you see the android froyo home screen, go back to the IDE and you can run again the program.


This time on the 'Device Chooser' screen, make sure the 'froyo 3.2 inch' is selected and then click ok to start running the application on the AVD.

Again, you have to be patient, because it will take some times to build the application, but once finish it will look like this:

Congratulation you have just create your first ever android application, and you don't do any programming at all, wow amazing :)
NOTE, this tutorial is based on these settings:
- Lubuntu 15.10 wily werewolf
- Open JDK 8
- Android Studio 1.5.1
No comments:
Post a Comment